Super Simple Christmas Ornaments

I am beyond excited that this year {being that it’s our third Christmas as a married couple} we finally got a Christmas tree! You see, our first Christmas we were living in a dungeon. Not only was there ZERO room for a Christmas tree, but I had a moral issue with placing something so iconic and tradition filled into a place that was so dreadfully heinous.

Thankfully we got out of said hell hole for our 2nd Christmas, but because we were spending a good portion of the holiday season out of town, we thought it was kind of silly to get a tree when we wouldn’t even be in the house to enjoy it.

THIS YEAR… thanks to the little bun I’ve got cookin’, we are doing Christmas at our house and a tree was a must. And none of that fake tree with built in lights nonsense {no offense if that’s what you prefer}, we wanted a real tree with a real tree smell and a real need to be watered! And that’s exactly what we got.

The biggest problem with going two Christmases without a tree is that we haven’t had a chance to stock up on ornaments. Wee’ve gotten a few here and there but I’ve done a pretty good job at resisting the urge to spend my entire paycheck on bows, bells and whistles to really make our first tree glow. Needless to say, I was worried that our current collection wouldn’t be enough to fill up the tree… and a baren tree is a sad tree. So I decided to add another DIY project to my list and make some unique and inexpensive ornaments myself with the help of a major sale on plain glass ornaments from JoAnn Fabric!

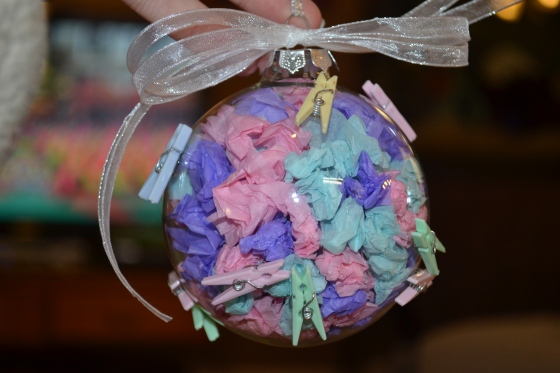
Style #1: Baby Shower Leftovers!
Along with a plethora of fantastic gifts from family and friends, my baby showers also brought me a ton of pastel colored tissue paper and fun party decorations. While I can use the tissue paper in the future, there’s little that I can do with the decorations… or so I thought.

Step 1… Tear and crinkle pieces of  colorful tissue paper, and fill the ornament.

Step 2… Use a WARM or HOT glue gun to scatter party decorations along the outside of the ornament. Finish with a boy and VOALA!

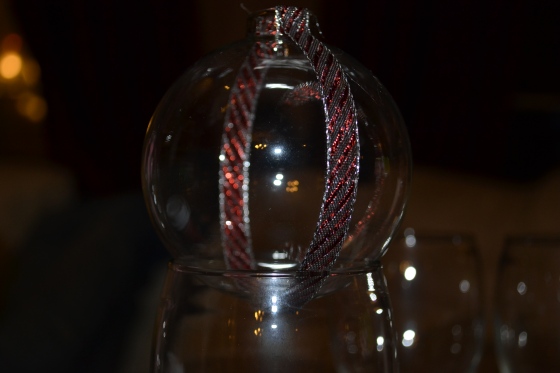
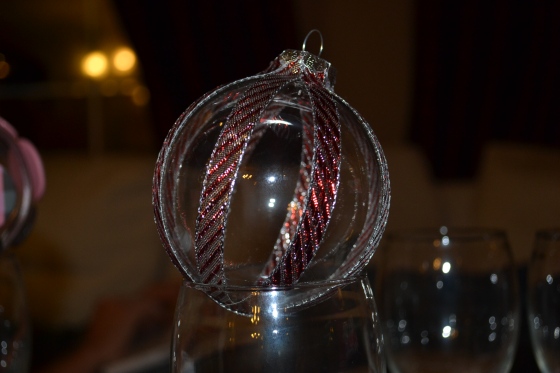
Style #2: Ribbon runners!
In the months surrounding the Christmas season, it’s great to keep an eye out for sales on decorative ribbons. You neer know what inspiration might hit and a DIY project is born…

Step 1… secure the ends of decorative ribbon to the inside of the glass ornament

Step 2… Pull the ribbon tight, securing along the way with a hot glue gun, to stretch across the outside of the ornament and secure the opposite end.

My favorite part about this particular style is that you can be as plain or as busy as you’d like. Here are a few different options that I really love. They look great hanging on the tree too… especially since the shimmer in the ribbon catches the the sparkle from the lights!

Style #3: Glitter globes
It’s been a while since I did a DIY project with glitter… I’ve truly missed it! You can really get creative by adding various shapes and colors to the outside of a plain glass ornament.

Here I applied the hot glue in circles around the ornament, and rolled them in glitter.

Diamond dust… to be specific. I LOVE this stuff… it kind of looks like tiny pieces of glass but is great for Christmas because it almost gives the appearance of glistening snow!

Style #4: Mix and Match
Once I dabbled in ribbons and diamond dust, I thought I’d let them combine forces!

After deciding that the ribbon alone wasn’t cutting it for me on this one, I added a touch of sparkle to make it pop!

This one started off as only glitter, but Z said it didn’t look finished, so I added the ribbon afterwards. I think it was a good decision! Point for the hubs!

And another… for fun. The same pattern is actually on the opposite side of the ornament as well!

FYI… I did purchase a value pack of cheap-o ornaments from Costo to act as temporary fillers until our collection can really grow. I figured 50+ ornaments for $20 was worth it!!

Until next time…

What do you think? Have you added any personal touches to simple glass ornaments? TELL ME ALL ABOUT IT!

Keelin knows her ABC’s…

… well, she doesn’t YET. But she will!

I know I’ve been promising to start filling you in on the endless amount of nursery crafts that I have been working on and I’ve been a bad bad blogger for not following through until now. But HAVE NO FEAR… DIY love is here! First on the list… a simple and fun wooden alphabet wall art.

As soon as we found out we would be adding to our family, I started looking around at nursery decorations. Magazines, websites, books, PINTEREST, blogs… you name it I probably took a gander at one point or another.  My main goal was to find things that, while they would be perfect as is, I could re-create for cheaper and with my own flair! After all, why spend $100 on something from a catalog when you can do it yourself for half the price {or even less}? While I became giddy by just about everything I stumbled upon, one of the first things I really fell in love with was a cut out alphabet wall hanging from a magazine called Land of Nod that a co-worker was kind enough to pass along.

small photo, but you get the idea

Simple, yet fun and PERFECT for a DIY project! I knew it would fit with ANY nursery theme and it’s something you can use for either gender. {I can’t remember if we knew we were having a girl yet when I finally started the project…oh well!}

No disrespect to Land of Nod, because obviously it’s adorable just the way it is, but there are PLENTY of expenses that come with little ones and I don’t think spending another $50 on a piece of wall art is worth it. SO, I set my DIY brain a working and headed to JoAnn Fabric and Crafts to see if I could make it happen on my own! I knew I had plenty of paint already to work with and a few different types of adhesive to choose from so the only thing I was missing were the letters!

I knew {because I’m in the store every week} that JoAnn had a number of different styles of wooden letters, but I wanted to go for something that was large enough for me to have some real fun with when it came to painting, thick enough that I could glue the letters together in a cluster without the entire piece falling apart, and light enough so it wouldn’t take 4 people and industrial-sized nails to hang it on the wall. Lucky for me {and for my bank account}, I signed up for the weekly coupon booklets from JoAnn so EVERY time I walk in the store I end up getting some kind of discount on one or more items. This day, I happened to not only have a plethora of coupons, but was greeted with a giant 99 cent SALE sign on some adorable wooden letters. SO, Z’s cousin and I {you may remember her recent visit with the BFG, Remus} sat in the middle of the aisle and picked out one of every letter of the alphabet. As soon as we got home I laid them out on the carpet to figure out the perfect arrangement and THIS was the final result:

LOVES IT!

Definitely a little chunkier than the Land of Nod version, but at about 1/2 the price {somewhere around $28 for all the letters, plus glue and paint that I already had} I’d say it’s a pretty good match!

I knew I wanted to bring a lot of fun into the paint but didn’t have a really clear idea of how to make it happen so I just started pulling random colors in here and there. Here’s the first version…

…and the final…

Fun and funky and filled with fun colors and patterns to STIMULATE little Keelin’s brain. Maybe too MANY patterns, but I’m still deciding on that. I may go back in and paint some of the plain beige letters a different solid color… but who knows!

The gluing process was really easy and, with the type of letters I chose, worked out perfectly. I’m a big ol’ dummy and didn’t document the actual process {which might be a good thing because I probably would have hot-glued myself to my camera had I tried!} but here are the basics.

When deciding on a layout for the letters, look for as many places that the letters can be touching. Corners, full sides, tiny edges, you name it. If you can make them connect, it’s the perfect place for some added support. I liked the idea of having the letters tilt at various angles and it ended up making things fit really nicely.

Using a hot glue gun, place small beads of glue on the side of the letters where they connect to one another. {use just a small amount and try to keep it ONLY on the sides of the letters so you don’t have glue showing through the front side} I did one row at a time just to make sure I was sticking with the pattern and look I wanted. Once you’ve gotten a single row finished, flip the entire row over and reinforce the connecting spots with more glue. Since this is the side that will be against the wall you can be as messy as you need to be to make sure you’ve created a firm hold.

Continue gluing, flipping it over to reinforce after every additional row.

The final product is lightweight, fun and perfect for ANY nursery design!

Here’s my final version up on the wall in Keelin’s room. It seemed much larger when I was working with it than it does up on the wall but that just gives me an excuse to fill up the open space with more fun things! Like I mentioned before, I have started to realize that once it’s up on the wall it’s a little tough to see some of the letters due to the patterns and colors that I chose so I might go back in and create more solid edges for each letter. That or switch things WAY up and cover all the patterns with a flat color… who knows!

Once I decide and get it done I’ll do an alphabet update!

Until next time…

I’ve got plenty more to share so stay tuned, but until then… what are some DIY projects you have re-created based on things you’ve seen in catalogs?

Master Bedroom Overhaul

I love our bedroom.
This wasn’t always the case.
Well, let me rephrase… I’ve always loved our bedroom for it’s vaulted ceiling, quirky layout and, well, for personal reasons. 🙂 But there’s always been one huge EYESORE of a problem with our bedroom.
THE COLOR
Overall we really lucked out with this house when we first purchased it because it was completely painted and, for the most part, matched our style perfectly! From the vertical stripes in the living room and the bright yellow and green in the kitchen to the dictionary page wallpaper in the downstairs bathroom {yes!} it was basically all done for us! There were, of course, a few bumps and scratches along the walls here and there but generally it was perfect. SANS our bedroom.
Here’s what it looked like when we first moved in:


While the layout is great, and I absolutely love how right side wall cuts inward for the bathroom and that top decorative shelf, the color is truly heinous. The coral orange isn’t too terrible but the puke yellow/green sponge paint is close to unbearable. It’s kind of hard to see {a little more noticeable in the 2nd photo} but the sponging would go from straight and patterned yellow to huffed-a-little-too-much-paint sporadic green. It made no sense and truly hurt my interior-designer-wannabe brain.

Pain us as it did, it’s taken is a YEAR to finally tackle it. Perhaps it was the nesting instinct kicking in that prompted me to spend the 4th of July weekend elbow deep in paint!… just perhaps!
But what to paint it?
I wanted something calm and serene… what a bedroom should be… and found some beautiful color ideas on my GO TO DIY blog, Young House Love.  They are frugal, fun, and fantastic at all they do!
About 6 months ago {when the overhaul “began} I bought some really simple forest green curtains for that large bay window in the first image… where our bed sits. You might remember them from this post. Those curtains became the inspiration for the rest of the room so I went searching for the perfect colors. Eventually we snagged these Glidden paint tester colors from Home Depot.

We decided the light green was a little too dark and a little too blue so we ended up going with something much more pale. Obviously with the bun in the oven I didn’t want to expose myself to too many fumes so we took another tip from the Petersik’s and color matched to Olympic No VOC paint. Fewer chemicals, hardly any fumes and recommended for pregnant women and nurseries. PERFECT!
So, I went to town at Lowe’s {terrible that I cheated on Home Depot but Lowe’s was having a 4th of July paint sale!} and went to TOWN. Unfortunately we didn’t have ANY paint supplies so I was basically starting from scratch. A larger bill {and the sale definitely helped knock some major bucks off} but I’m stocked up for the nursery and other future projects!
I was really worried that I would have to do a million coats of primer to cover up the hideoderousness of the vomit grellow sponge paint, not to mention the walls are textured, but I was happy to find that one coat covered quite nicely.
Rather than talking you through the process… allow me to SHOW you how it all went down!

 
What a mess! EVERYTHING in the center of the room and the walls primed! 1 coat did the job just fine considering we were planning on doing 2 coats of color!
First coat of the pale green. We had to mark the dark green walls with X’s because we kept painting the trim the wrong color! 
the beginnings of dark green!
Absolutely love this color!
CLEARLY one coat wouldn’t be enough. 
TWO AND DONE!
finished product with most of the furniture back in its place
my favorite part of the room, the bed nook 

 So… what do you think?
BIG improvement, right?


Until next time…
Have you done any large paint jobs recently? TELL ME ALL ABOUT IT!